Inspiration
My previous post on DIY Home automation with Node-Red was hosted in the cloud and didn’t work during public internet outages. So, I decided to use a local first, and private solution - Home Assistant.
Requirements
-
A SBC or any hardware that can run Home Assistant as its primary OS, in a virtual machine, or as a Docker container. I am using a Raspberry Pi 4B.
-
Edge IoT devices that can communicate via the MQTT protocol, like ESP8266, ESP32. I am using an ESP-01, compatible relay boards, and a compatible USB flasher
-
There are several ways to install Home assistant on a Raspberry Pi. I am installing it using Docker, so I have other self-hosted apps running alongside.
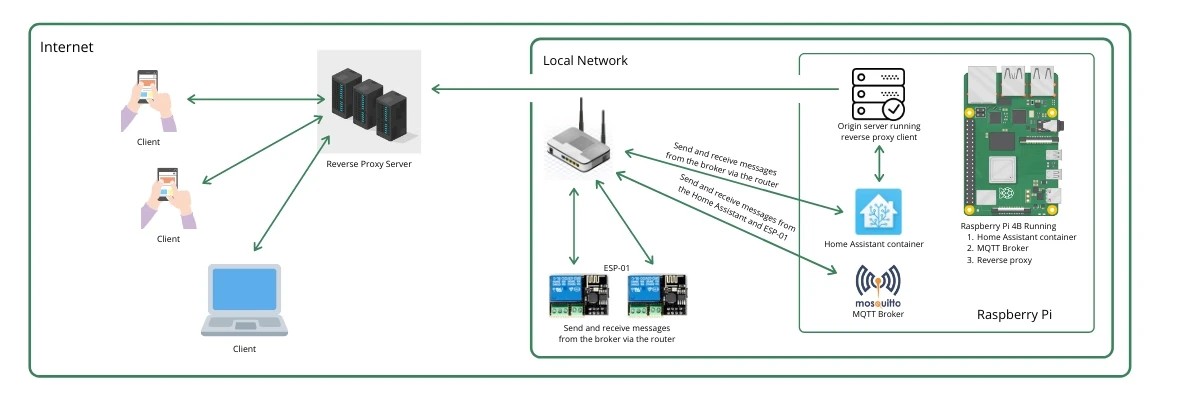
Network map of the setup
Advantages
-
Surface rewiring will work most of the time. No need to buy smart lights, fans, appliances.
-
Existing smart devices can be integrated into Home Assistant.
-
Low cost hardware with open source and free software makes a great combination for cheap but highly reliable solution.
-
Easily replaceable and up-gradable hardware.
-
Security issues about smart CCTVs not using end-to-end encryption or sometimes no encryption (unbelievable) were recently in the news. So all data is stored locally.
-
A large amount of data generated from smart home devices can be misused if a third-party server in some other country owns it. This solution respects your privacy by not sending your data anywhere. You own it.
-
Regular updates, security fixes for the software. Thanks to the Home Assistant community.
-
Devices communicate locally, but the dashboard can still be accessed remotely.
Install docker on Raspberry Pi
I am using the convenience script.
$ curl -fsSL https://get.docker.com -o get-docker.sh
$ sudo sh get-docker.sh
Pull and run the Home Assistant container
On Raspberry Pi 3
$ docker run --init -d \
  --name homeassistant \
  --restart=unless-stopped \
  -v /etc/localtime:/etc/localtime:ro \
  -v /PATH_TO_YOUR_CONFIG:/config \
  --network=host \
  homeassistant/raspberrypi3-homeassistant:stable
On Raspberry Pi 4
$ docker run --init -d \
  --name homeassistant \
  --restart=unless-stopped \
  -v /etc/localtime:/etc/localtime:ro \
  -v /PATH_TO_YOUR_CONFIG:/config \
  --network=host \
  homeassistant/raspberrypi4-homeassistant:stable
Tip: Use “docker ps -a” to see all your running containers and their status.
docker ps -a
Setting up the Home Assistant
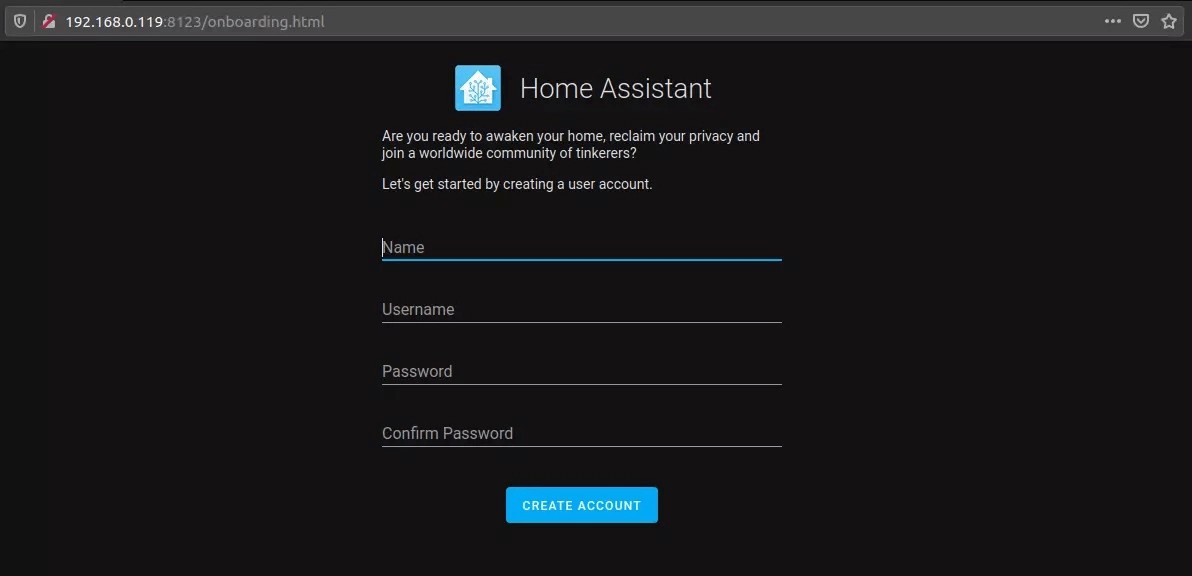
After your Home Assistant container shows a healthy status, visit the IP Address of your Pi followed by port number 8123 (for e.g. mine is http://192.168.0.119:8123).
Tip: You can also visit http://raspberrypi.local:8123 (works most of the time).
Create a user account. This account is just used to log in to Home Assistant. It’s not an online account.
During the setup process, Home Assistant will automatically detect If you have printers, smart lights, cast devices, smart speakers, etc. Add them to your dashboard if you wish.
Setting up a MQTT broker
MQTT is one of the best open protocols used for home automation. Setting up a MQTT broker will allow us to control and check device status of all connected devices. MQTT allows two-way communication, message quality control and more.
I know about Matter, but I don’t like it for its proprietary nature. I recommend reading MQTT for dummies to get a basic understanding of the MQTT protocol.
I am installing the Eclipse Mosquitto MQTT broker (without docker).
   $ sudo apt update
   $ sudo apt install -y mosquitto mosquitto-clients
Set Mosquitto to auto-start on boot
$ sudo systemctl enable mosquitto.service
Make Home Assistant talk to the MQTT broker
Navigate to Home Assistant dashboard -> Configuration -> Integrations.
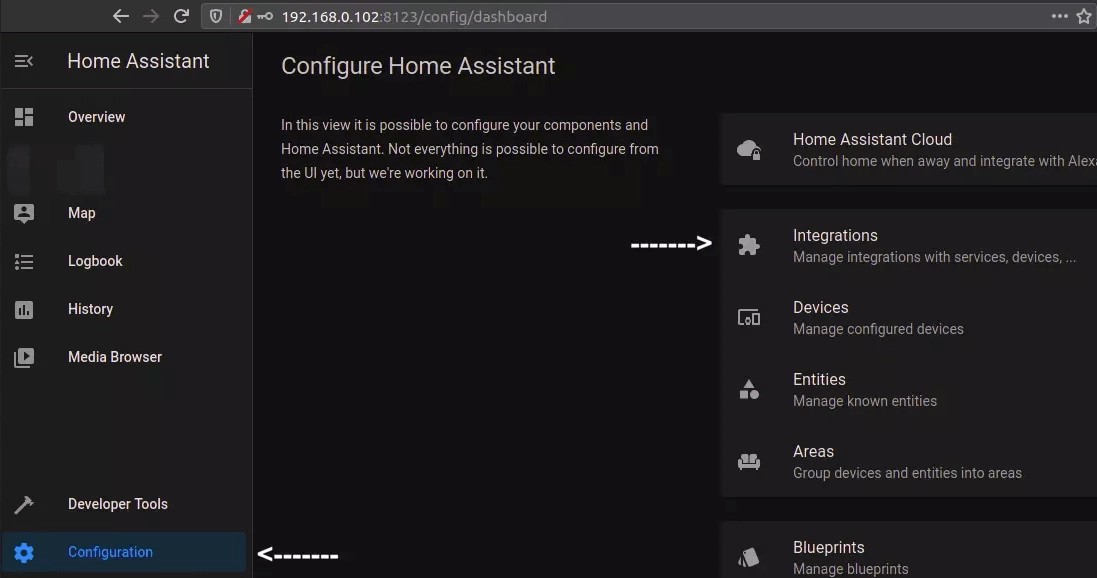
Click on Add Integration -> search for “MQTT” and click on the MQTT integration.
Complete the setup by entering the IP Address of your MQTT client and it’s port. If you are following this tutorial, the IP Address will be 127.0.0.1 and the port will be 1883 (127.0.0.1:1883).

Setting up the Arduino IDE
- Install the Arduino IDE.
- Install the ESP8266 package using the Arduino Board manager.
Setting up the ESP-01
The following C++ program will allow the ESP-01 to connect to your Wi-Fi and communicate with the MQTT server hosted on your Home Assistant hardware. I have added useful tips as comments.
Tip: Alternatively, you can install Tasmota which has a lot of configuration options with it’s own easy to use web dashboard.
#include "EspMQTTClient.h"

EspMQTTClient client(
  "WiFi Name",
  "WiFi Password",
  "MQTT Broker server IP Address",      // IP Address of your Raspberry Pi
  "mqtt username",                      // (Leave blank)
  "mqtt password",                      // (Leave blank)
  "light",                               // Client name to identify your device
  1883                                  // The MQTT port, default is 1883.
);

void setup()
{
  Serial.begin(115200);
  pinMode(0, OUTPUT);
}

void onConnectionEstablished()
{
  client.subscribe("livingroom/light/com", [](const String & payload) {
    if (payload == "1") {digitalWrite(0, HIGH);
                          client.publish("livingroom/light/state", "1");
                         }
    if (payload == "0") {digitalWrite(0, LOW);
                           client.publish("livingroom/light/state", "0");
                          }
  });
}

void loop()
{
  client.loop();
}
Modify your ESP USB flasher to flash the ESP-01 with the code above.

Adding usable toggles to Home Assistant
As we are running our Home Assistant in a Docker container, we have to ssh into the Home Assistant container by using the following command and modify the configuration.yaml file.
   $ sudo docker exec –it homeassistant /bin/bash
   $ nano configuration.yaml  (If this command doesn't work, you will need to install nano using "apk install nano")
Example config:
light:
  - platform: mqtt
    name: "Living Room Lights"
    state_topic: "livingroom/lights/state"
    command_topic: "livingroom/lights/com"
    payload_on: "1"
    payload_off: "0"
  - platform: mqtt
    name: "Lounge Lights"
    state_topic: "lounge/lights/state"
    command_topic: "lounge/lights/com"
    payload_on: "1"
    payload_off: "0"
This is an example config and you can add more devices and categories if you like. Extended configuration options are explained in the Home Assistant Docs.
Tip: Notice how the Home Assistant publishes command to the “bathroom/lights/com” and the ESP-01 is subscribed to the same topic.
Extended configuration options are explained in the Home Assistant Docs.
Access your Home Assistant remotely
The most common way to access a device over the internet is to set up Port forwarding on your router, but I opt for a reverse proxy because I am behind a NAT and too lazy to get an SSL certificate.
Here are some good reverse proxy providers to choose from:
Setting up Pagekite for remote access is fairly simple and can be done completely from a command line. Just use the commands below.
   $ curl -O https://pagekite.net/pk/pagekite.py
   $ python2 pagekite.py 8123 SUBDOMAIN-THAT-YOU-WANT.pagekite.me
PageKite proxy client will start once you confirm your details with pagekite. You can visit SUBDOMAIN-THAT-YOU-WANT.pagekite.me and access your Home Assistant over the Internet. This URL can be used when you sign in with Mobile apps of Home Assistant.
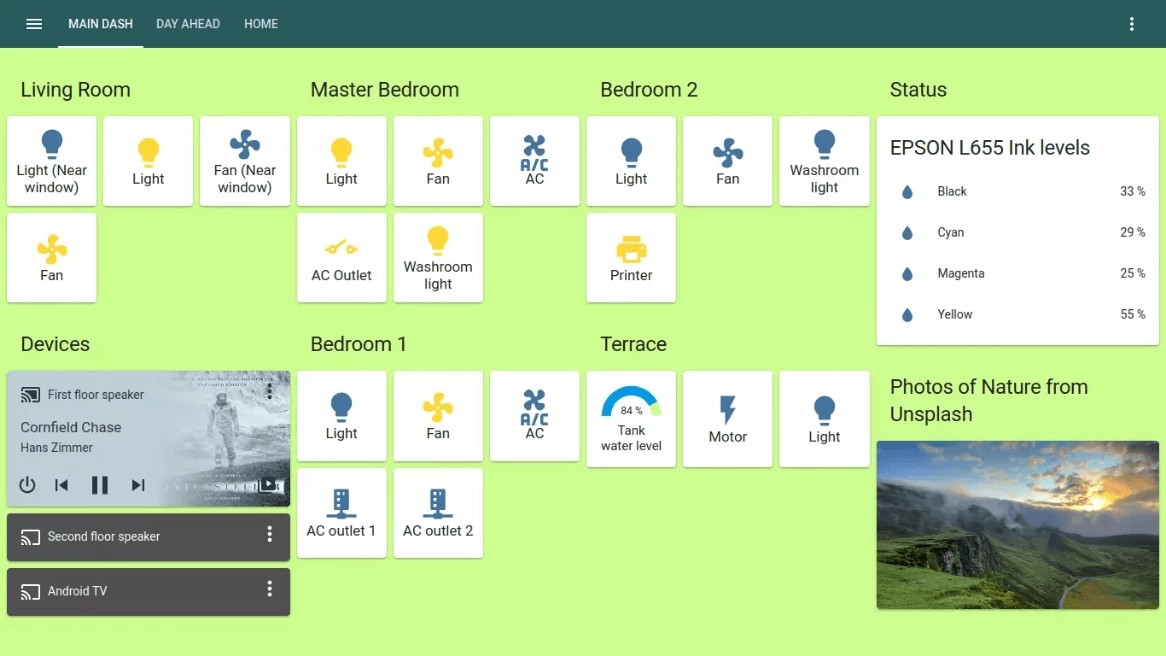
Customize the Home Assistant dashboard
To demonstrate customization, I applied a custom theme using the configuration.yaml file.
# Example configuration.yaml entry
frontend:
  themes:
    happy:
      primary-color: white
      text-primary-color: black
      background-primary-color: #cefe8e